How the new Taming Knots works
Hello dear reader, and welcome to the brand new Taming Knots! I would say it’s improved, but… well it arguably hasn’t. But at least it hasn’t really gotten worse either. Because of this change, I want to do a rundown of how the site works now, my workflow going forward, and what that means for my writing here. Before all that, though, I should go over the old site a bit and explain why I would want to move.
Goodbye, Pika.page
Like I said in my moving post on Pika, I love Pika Page and everything else Good Enough makes. They seem to have a really great vision for the kinds of things they want to make and how to make those sustainable. To be perfectly honest, I’m kind of sad to not use their platform anymore.
The reasons I’m moving away from Pika are twofold. First, and the most practical thing, is that I am a very cheap person generally. It’s very hard for me to justify spending sixty dollars a year or more (with a domain) on the blog when cheaper options that meet the same requirements are available. I put myself under very stringent budgetary constraints regularly. I understand that, for a lot of folks, sixty bucks isn’t a lot and they are right. But what if I could host the blog for free on Github Pages in exchange for a little extra work on my end? That suddenly removes a ton of pressure for me to write continuously and allows me to have more fun with the writing of the blog.
The second reason is kind of linked up with that last point. I am finding a lot of enjoyment in building out a layer of services that I maintain myself or at least allow me to do some more nuts and bolts work on them. I’ve set up media streaming, cloud-less cloud storage, an RSS reader and subscription server, and a few other things for my home server. I originally also wanted to host the blog there, but I think it’s more secure to put a separation between my personal files and the public blog. As a sort of half-step measure between having a fully managed service to blog on and hosting it myself, I’ve taken to using a static site generator to build and maintain the blog, but using a separate service provider to host it. The benefit? this service provider’s free limitations are extremely generous. I could write thousands of posts, even with images and not run out of space. But I’m getting ahead of myself.
Enter Hugo
Hugo is a static site generator. Most websites on the internet are dynamic, offering interactive elements, tracking, analytics, advertising, and myriad other bells and whistles. Hugo, and similar generators like Jekyll or 11ty, work by taking some input files, usually markdown text, applying a set of HTML and/or CSS templates to them, then spitting out static HTML webpages. These pages are light and fast to load, even on slow mobile networks and thanks to the HTML and CSS, they look pretty nice too.
I started by trying Jekyll, since it came recommended by my blog pal, Joel. I ran into a snag when I tried to deploy the site though, so I eventually dropped it. I briefly looked at 11ty, but I didn’t really like the setup for it. The last one I tried, Hugo, was immediately the one I stuck with. There were a few false starts surrounding theming, but eventually I realized that I was thinking about modifying an existing theme all wrong and got everything up and running fairly smoothly.
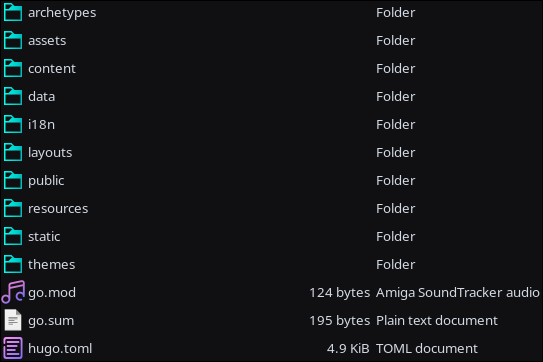
The site directory is laid out in a sensible way. archetypes holds the basic layout for the front matter for blog posts. assets holds an override for the theme’s colors (more on that in a minute) and exists to hold site assets like the favicon or other commonly used images, scss, or css that will be used all over the site. content is where the posts and pages live (in their own subfolders.) data is a folder for shortcode that can take input data from another source and output it in a nice format inside a post. I don’t forsee myself using that one much. i18n is for localization content, basically allowing the blog to be multilingual if only it were so easy for me to pick up another language. layouts is for overrides to default page layouts set by the theme. public is where Hugo outputs the final site in HTML for consumption. resources holds the resources the code snippets in data take as input. static is where images that are hosted on the blog go. Finally, the themes directory is where the site’s theme, hugo-blog-awesome lives. The directory structure of the theme is basically identical to the base hugo structure. The theme’s files act as a base and the main directory override those files. For example, this is what themes/hugo-blog-awesome/assets/sass/main.scss’s first two sections look like:
//////////////// 1. Light Colors /////////////////
$text-base-color: #434648;
$text-link-blue: #003fff;
$text-link-blue-active: #0036c7;
$bloquote-border: #c4c8cc;
$blockquote-text: #525b66;
$inline-code-text: #333638;
$inline-code-bg: #d8dbe2;
$toc-bg: #edecec;
$go-top-bg: #dfe0e397;
$go-top-bg-hover: #dfe0e3;

$black: #0d122b;
$light: #ececec;
$smoke: #d2c7c7;
$gray: #6b7886;
$white: #fff;

//////////////// 2. Dark Colors /////////////////
$dark-text-base-color: #babdc4;
$dark-text-link-blue: #77a8fd;
$dark-text-link-blue-active: #5292ff;
$dark-bloquote-border: #4a4d56;
$dark-blockquote-text: #9b9ba3;
$dark-inline-code-text: #c2c4ca;
$dark-inline-code-bg: #2d2d2d;
$dark-toc-bg: #323232;
$dark-go-top-bg: #676767b3;
$dark-go-top-bg-hover: #676767;

$dark-black: #131418;
$dark-white: #eaeaea;
$dark-light: #1b1d25;
$dark-smoke: #4a4d56;
$dark-gray: #767f87;
Basically it sets a bunch of colors. Now here’s the first sections of the main.scss file located in asseets/sass in the main site directory:
//////////////// 1. Light Colors /////////////////
$text-base-color: #000D1B;
$text-link-blue: #015D9D;
$text-link-blue-active: #004577;
$bloquote-border: #c4c8cc;
$blockquote-text: #57606b;
$inline-code-text: #000D1B;
$inline-code-bg: #d8dbe2;
$toc-bg: #edecec;
$go-top-bg: #dfe0e397;
$go-top-bg-hover: #dfe0e3;

$black: #0d122b;
$light: #e9b394;
$smoke: #D4916B;
$gray: #B47458;
$white: #ebd1c2;

//////////////// 2. Dark Colors /////////////////
$dark-text-base-color: #bfc2c6;
$dark-text-link-blue: #D4916B;
$dark-text-link-blue-active: #B47458;
$dark-bloquote-border: #4a4d56;
$dark-blockquote-text: #9b9ba3;
$dark-inline-code-text: #bfc2c6;
$dark-inline-code-bg: #005270;
$dark-toc-bg: #323232;
$dark-go-top-bg: #676767b3;
$dark-go-top-bg-hover: #676767;

$dark-black: #000D1B;
$dark-white: #eaeaea;
$dark-light: #00406d;
$dark-smoke: #00284b;
$dark-gray: #42474e;
As you can see, the colors have been changed. This override file lets me change those colors without modifying anything else about the theme. Similarly I can make modified copies of anything in the themes directory to make new overrides to change other parts of how the site looks. In fact, the hugo.toml file in the root of the site is itself an override of the theme’s version.
Writing
As mentioned before, all of the site’s content is in markdown files and images. Markdown syntax is really easy to write in and provides most easy layout options. It turns *this* **weirdly formatted** *text* into this weirdly formatted text. It can handle lists, ordered lists, links, and a bunch of other useful stuff. When sent through the Hugo parser, you can even mix HTML with Markdown. That’s how I’ve embedded the Letterbird contact form for the site in the Contact Page.
As for how I write the posts, I’ve tried a few markdown editors and I’ve landed on MarkText It does a few things for me that I really like. It can be set up to open a directory of files in the sidebar automatically so I can easily reference old posts. It supports front matter in the format Hugo expects (although I do wish it could automatically add the parameters that Hugo expects in the front matter.) It also supports automatically adding images from the clipboard or dragged into the editor to the site’s static directory. When an image is added to the editor, it uses this syntax to automatically embed the image. . Hugo doesn’t technically need the /../../static part, but this setup allows the MarkText preview to correctly display images and doesn’t break anything for the site.
Once a post is written and ready to publish, I flip the draft = parameter in the front matter to true, then save the file in /content/posts. With everything staged and ready, I open a terminal and execute my deployment script.
The deployment script is a tiny, simple shell script that just combines a few commands for me. It looks something like this
#!/bin/bash
CWD=$(pwd)
cd /home/brent/Documents/Projects/taming-knots
hugo
git add -A
git commit -m "Updated Blog"
git push
cd $CWD
The script saves the currently open directory in a variable, CWD, then changes to the location of the blog folder. The hugo command makes Hugo build the site locally first. It’s not necessary for me, but I like to see if it hits any errors right away. Then, the script looks for and adds any changed or new files to a commit, writes a commit message, then pushes the change to GitHub Pages before setting the terminal directory back to where it was open previously. The script is saved into a ~/.scripts/ folder that I have added to my $PATH so that I can invoke it from anywhere in the system and it will still work and put me right back where I was.
Deployment
Once the files are pushed to GitHub, the repository automatically runs the build and deploy action through a GitHub Workflow. I use the one Hugo’s developers recommend with no modification at all, so I won’t clog up the post by pasting it here. It basically just sets up a temporary environment just to run the hugo command, then deploys everything in the public folder to the Github Pages url. Adding a new post takes about thirty seconds. Not too shabby for free.
The site is hosted on GitHub Pages, but the domain I use is registered with Porkbun. Porkbun is my name server as well, so I just have it set up with an A record to forward to GitHub Pages and I put the domain in to the Github Pages control panel for the repository to make sure it gets forwarded to the right place.
Wrapping up
Welp that’s about it. I might go deeper into how I set up the site in the first place, but honestly Hugo is so easy to work with that I would recommend just going for it and trying it yourself if you’re curious. The official documentation is great as well. Sure it’s a little more fiddly than the excellent Pika.page editor, but it was fun and interesting to set up and now I have a complete, working offline copy of the site with backups of all of my posts so if anything happens to Taming Knots, I’ll be able to put it back up somewhere else.